Scrum bastard

In my current job I am a Scrum Master ™ :), apart from being one of the developers. In Scrum, you work in iterations of say, two to four weeks [1]. At the start of an iteration, it is clear which functionality or "user story" has to be realized in that iteration. Already these stories have been prepared or "groomed" by and with product owners so the team understands what is needed and can estimate the work involved. This does not mean these stories are specified in the fullest detail. Often during the iteration uncertainties and obstacles crop up but ideally, nothing really serious. The team can always approach the product owner to answer any questions or to make a decision.

This week something happened which really made me doubt my easy-goingness as a Scrum Master and it was not the first time. One of the stories, "Update the manual for the new functionality", was not groomed. Both product owners had been working on other things and planned grooming sessions were cancelled multiple times and in the end, postponed indefinitely. So the product owners and the team decided to just go on with the story, because, what is so unclear about the update to a manual? After a days work we presented the end result to one of the product owners. His reply was along the lines of "Nice, but I had imagined you would also write about A and B. Please change it.".

I was really annoyed by that, at least internally, because I do not like doing things twice. This time we got lucky and the changes he proposed were really additions, so there was hardly any rework. However it did impact our iteration planning. More importantly, this could have been avoided, if I, as a Scrum Master or even just as a team member, would have insisted on grooming the story. As mentioned, I am an easy-going person, the product owners were busy doing other things, yada yada yada...

What is the moral of this story? To never work on new functionality of which you only think of what the scope is? That sounds extreme and I can think of a lot of situations where it is extreme. You could even say that it is extreme for this small example. But if you work in an environment which has a tendency to "undergroom" its stories and as such, have an outcome like the one mentioned in this post, consider being a "scrum bastard" every once and a while. Insist that stories get the attention they deserve. Play it black and white: if stories are not worth being groomed, they are not worth being worked on.

[1] For more information, the official Scrum Guide forms a good introduction.

Awesome window manager

  • updated 2013/10/01 to add missing bitmaps and a missing link: the original version was deployed by accident

I am writing this blog post on a 6 year old laptop. When I bought it in 2006, its specs were great, or at least I thought so: AMD Mobile Turion 64 processor, 2 GB of RAM, 80 Gb HDD and an NVidia Geforce Go 6200 graphics card with 256 MB on board. However time has passed and it is definitely not the fastest tool in the shed anymore. Its specs still seemed good enough for my purposes and I decided to spent some time on getting it up to speed again.

To cut a long story short, I brought this quest to a successful end but only because my free time does not cost money. I enjoyed the journey and it is the journey that counts.

The family laptop, which is a few years less ancient, is running Ubuntu 12.04 with Unity 3D and I like it very much. I also installed that combination on the old workhorse but that proved to be too much: Unity 3D did not even run and Unity 2D was sluggish. The previous time I had to use older hardware I settled for the more lightweight desktop environment (DE) XFCE. At the time I quite liked it so I decided to use it again.

The XFCE spin of Ubuntu, named Xubuntu, worked a lot better. But from time to time it still was a bit sluggish. A real annoyance was that applications I defined to run at startup sometimes did not run or ran too early and there effects were discarded. For example, one of my startup applications was the command to make my Caps Lock a Crtl key and to set my Compose key:

setxkbmap -option compose:rctrl -option ctrl:nocaps

More often that not I had to rerun that statement after login. The same was true for the xrandr statement that sets my second monitor correctly.

The biggest issue was the delay after I had logged in: after login, it could take a minute before the desktop was shown. By the way, it turned out that that delay was not caused by XFCE :) but more about that later.

The hardware was not the only reason to look for another desktop environment. At work I also use Xubuntu and in that setup I often have multiple terminal windows open. It can be a bit of a hassle to manually layout these (and other) windows on my desktop. I knew that there were window managers that could do that automatically for me and this brought me to Awesome.

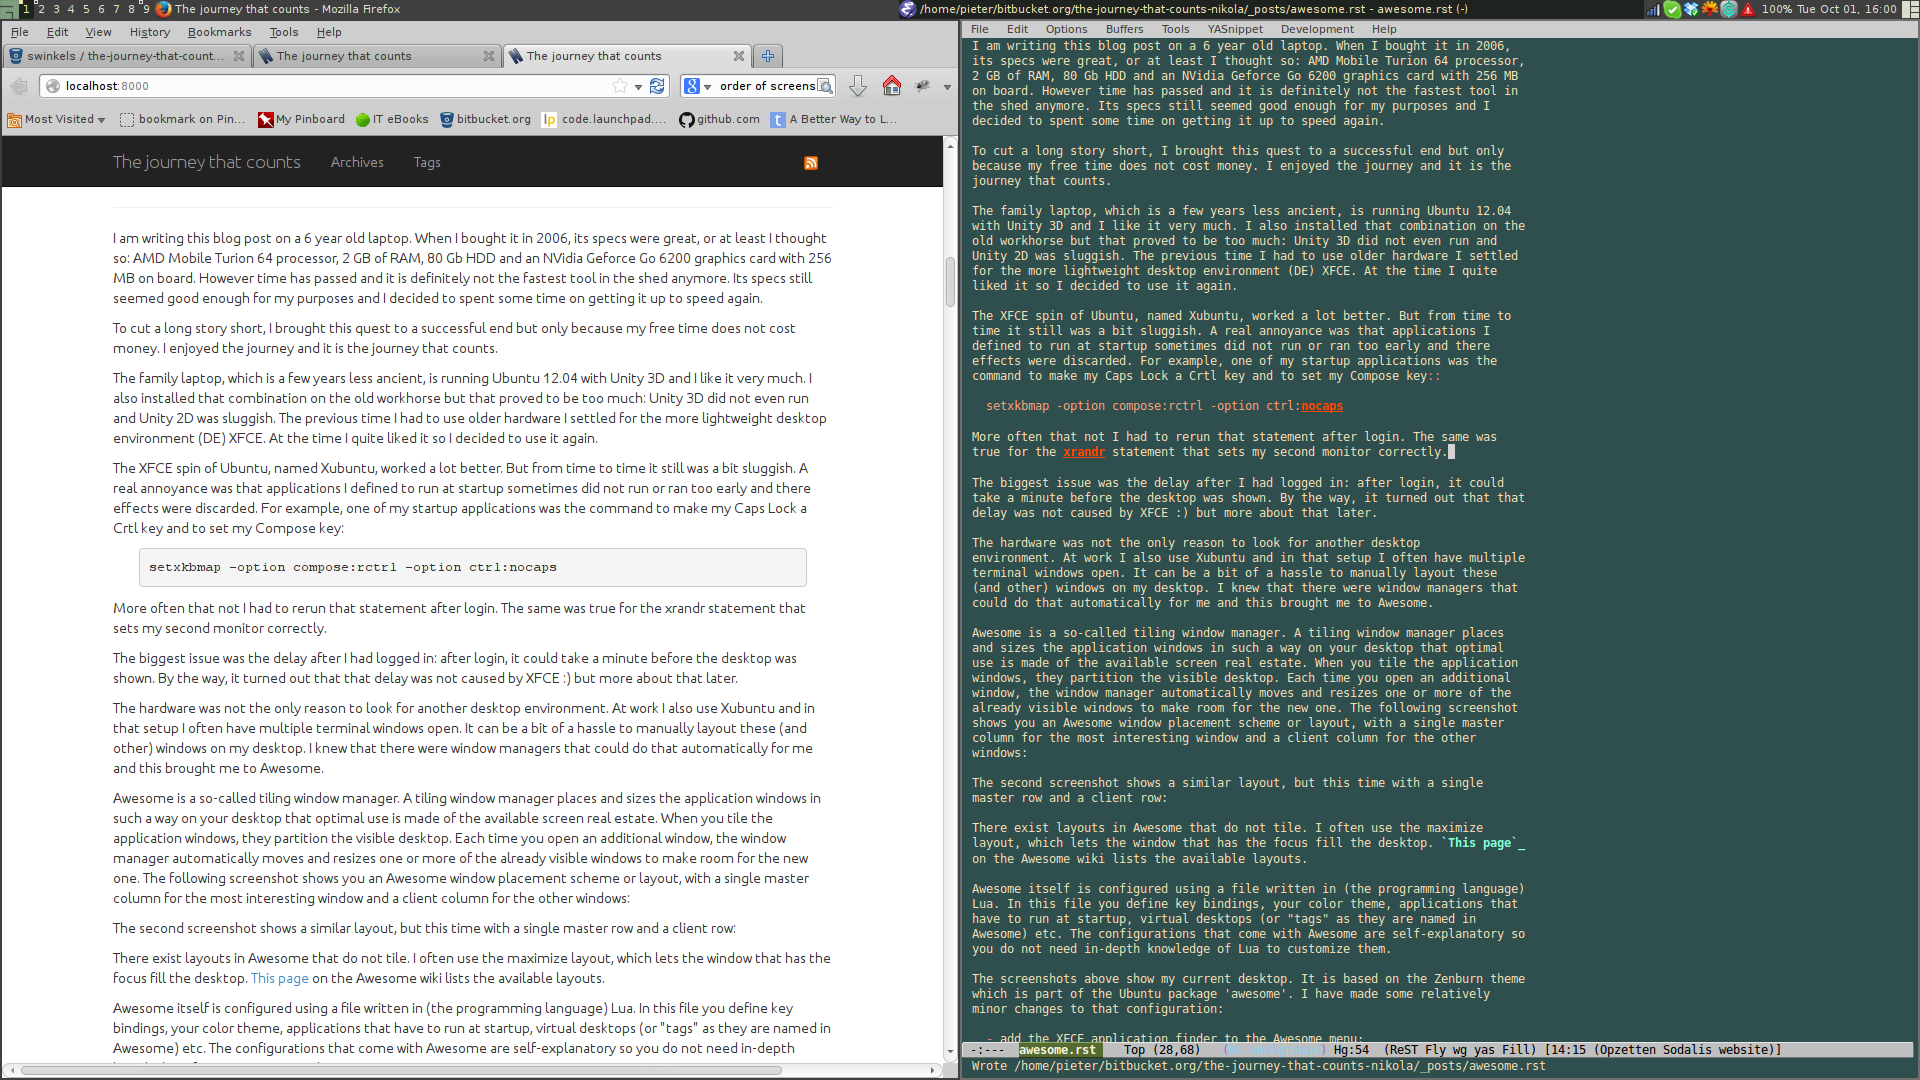
Awesome is a so-called tiling window manager. A tiling window manager places and sizes the application windows in such a way on your desktop that optimal use is made of the available screen real estate. When you tile the application windows, they partition the visible desktop. Each time you open an additional window, the window manager automatically moves and resizes one or more of the already visible windows to make room for the new one. The following screenshot shows you an Awesome window placement scheme or layout, with a single master column for the most interesting window and a client column for the other windows:

/images/vertical-layout.png

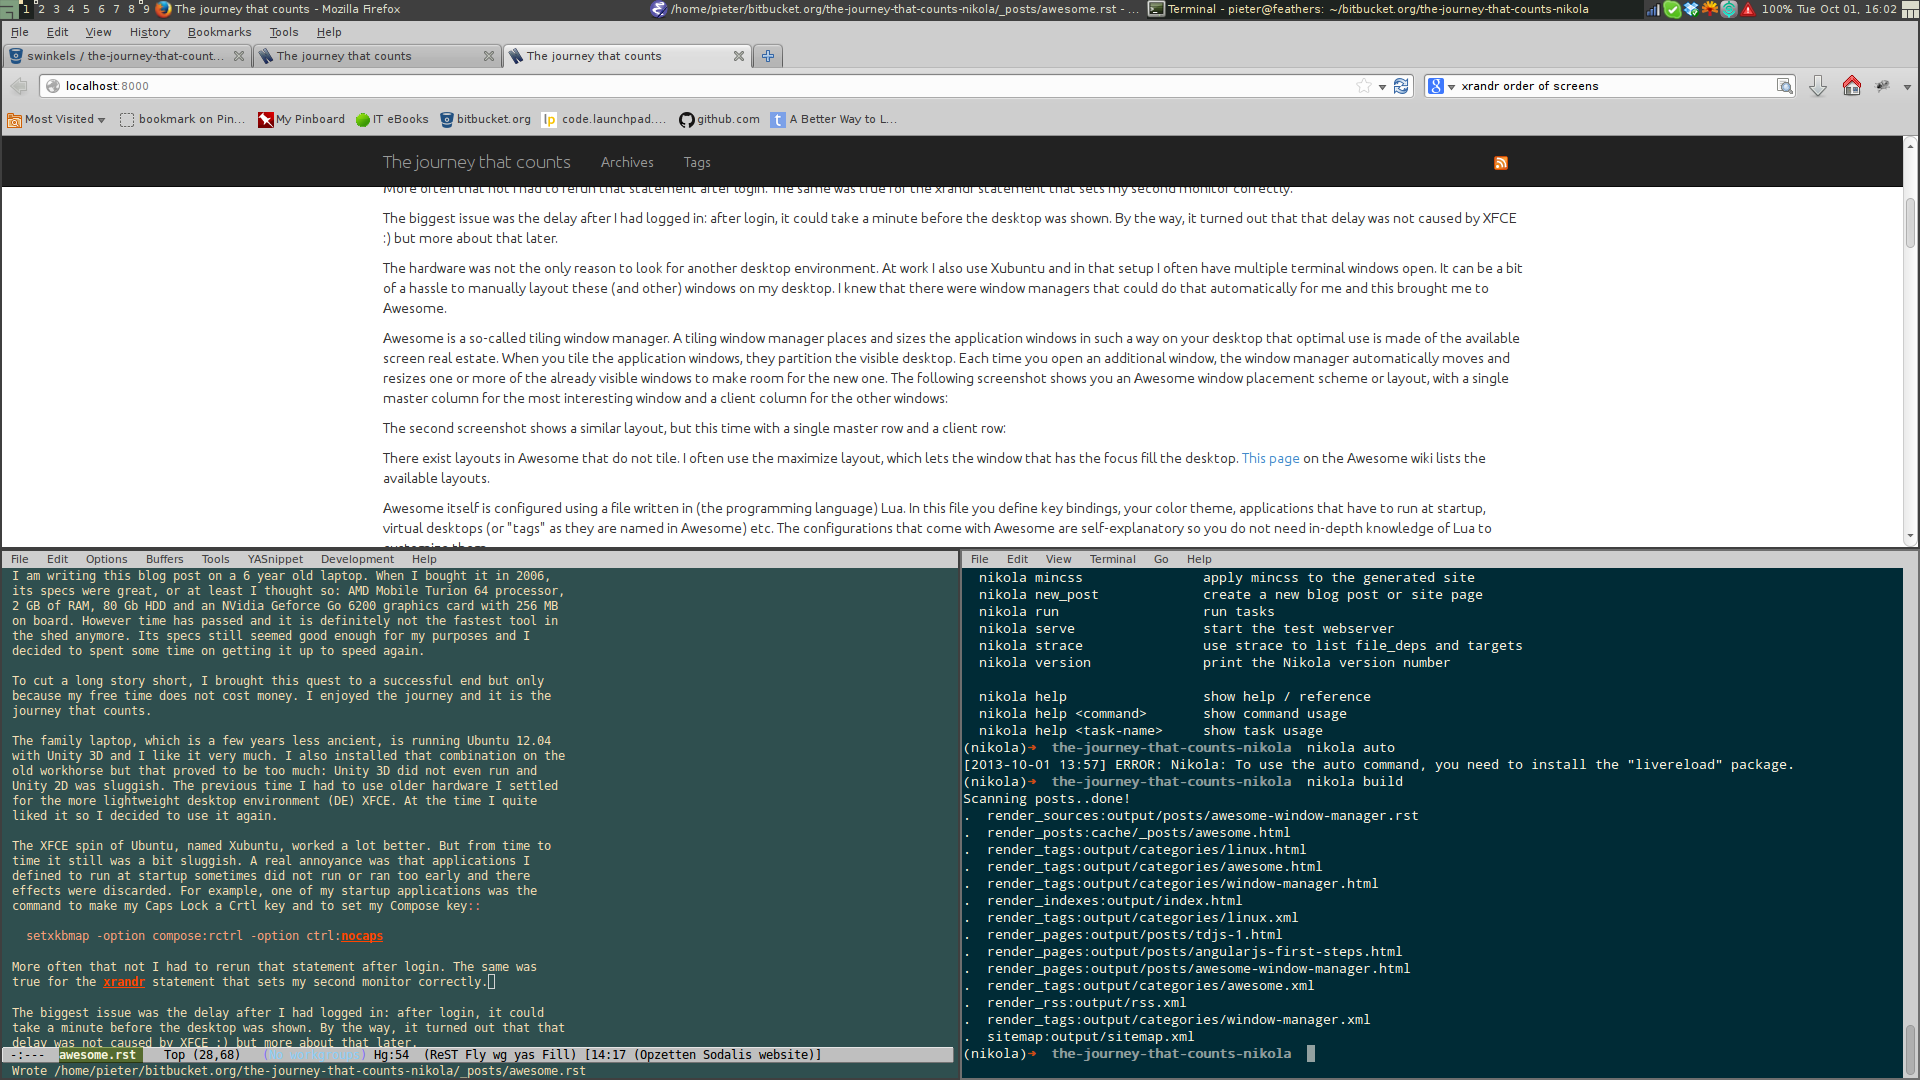
The second screenshot shows a similar layout, but this time with a single master row and a client row:

/images/horizontal-layout.png

There exist layouts in Awesome that do not tile. I often use the maximize layout, which lets the window that has the focus fill the desktop. This page on the Awesome wiki lists the available layouts.

Awesome itself is configured using a file written in (the programming language) Lua. In this file you define key bindings, your color theme, applications that have to run at startup, virtual desktops (or "tags" as they are named in Awesome) etc. The configurations that come with Awesome are self-explanatory so you do not need in-depth knowledge of Lua to customize them.

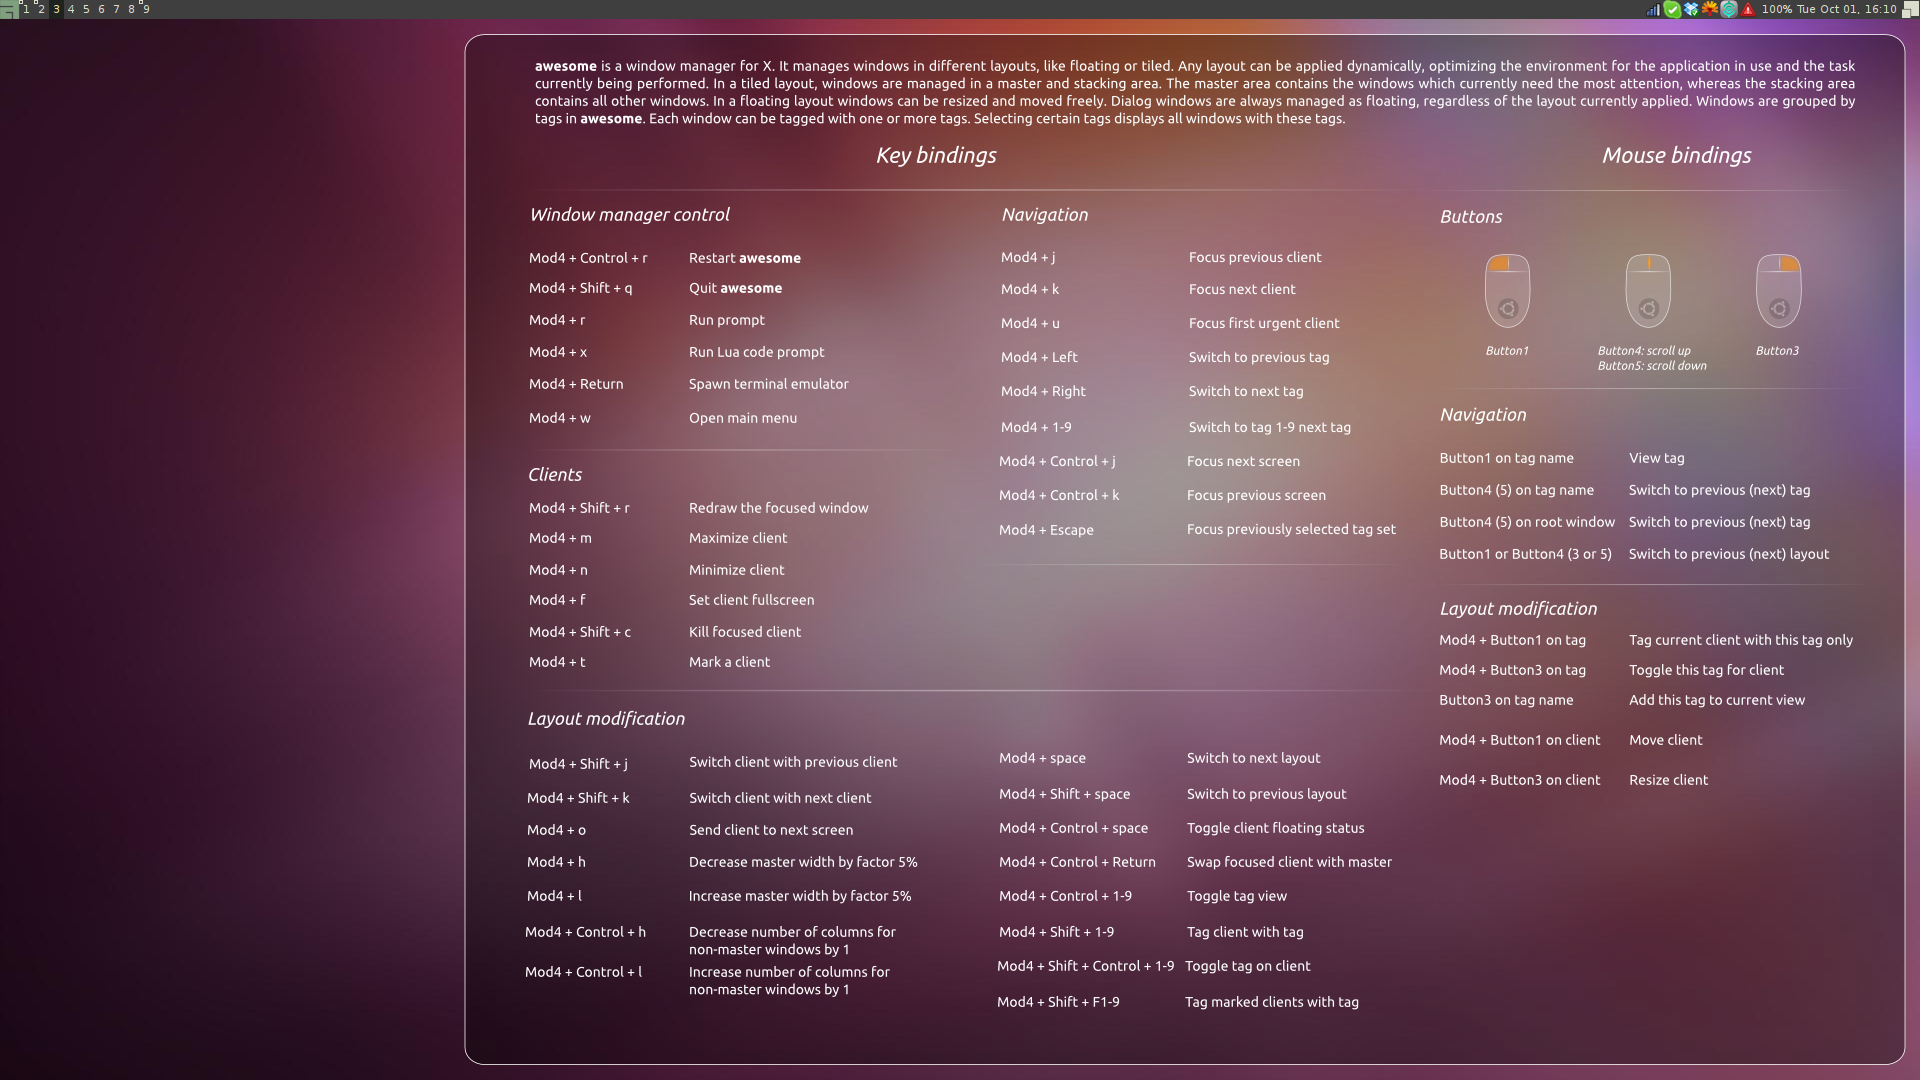
/images/awesome-background.png

The screenshot above shows my current desktop. It is based on the Zenburn theme which is part of the Ubuntu package 'awesome'. I have made some relatively minor changes to that configuration:

  • add the XFCE application finder to the Awesome menu;
  • bind Alt-F2 to launch the application runner gmrun;
  • rebind several keys with regard to window navigation and placement;
  • use a custom desktop background with the Awesome key and mouse bindings.

You can find the complete complete configuration in my awesome Bitbucket repo. If the background seems familiar, that is correct. It is based on an image that comes with Ubuntu Unity that shows its key and mouse bindings. As Awesome comes with a lot of key bindings, which I still have not memorized, I tracked down the SVG of the Ubuntu Unity image and adapted that to Awesome. You can find both the SVG and a 1920x1080 rendition of it in my repo.

Awesome is a window manager and I quickly found a window manager is not the same as a desktop environment (DE). For example, XFCE implements the functionality to modify the appearance of your desktop, start the screensaver, automount USB devices, shutdown your workstation as an ordinary user. So the first time I ran Awesome, I was looking at large fonts and ugly widgets instead of the finely-tuned appearance I defined in XFCE. The easiest way to resolve that was by (automatically) starting xfsettings after login. The fonts of the Qt application however remained large and ugly. To get them to show the right fonts I had to set the Fontconfig configuration [1]. The README of the Bitbucket repo explains all this and more.

As already mentioned, my personal configuration makes use of XFCE. So if you want to reuse that configuration and your desktop environment is not XFCE, it will not work for you. Probably you just have to make a few minor changes to get it to work with another desktop environment or without any at all.

I want to close it off with the following. Earlier I mentioned the delay that occurred after I had logged in to XFCE. Unfortunately this delay occurred even when I used Awesome... It turned out that this is not a problem with XFCE but one with LightDM, the login manager Xubuntu uses, and 64-bit machines, see bug #996791 on Launchpad :).

Have fun with it!

[1] Visit https://wiki.archlinux.org/index.php/Font_Configuration for an excellent explanation.

Living documentation with Dexy

In the current Sphinx documentation of cmake-boost-test, chapter Running the test executables explains how to use CTest. It shows how to register tests in the CMake list file that you can then execute via a simple invocation of "make test". It also shows the output of that call, that is, the output as it was when I wrote the chapter and manually copied it into the Sphinx source file. Since then I have added other tests, which I also describe in other parts of the documentation, but whose output does not appear in the example.

So how do we keep those examples up-to-date? It is a boring task that is easy to forget, or should I say, neglect. This is were the Python tool Dexy comes to the rescue. Dexy allows you to capture the output of any command and place that output in your documents. To get a feel of how it works, take a look at an earlier version of the Sphinx document running-tests.rst. It contained the following example output of "make test":

Running tests...
Test project /home/pieter/bitbucket.org/cmake-boost-test/build/beck
    Start 1: my-boost-test
1/4 Test #1: my-boost-test ....................   Passed    0.01 sec
    Start 2: my-static-boost-test
2/4 Test #2: my-static-boost-test .............   Passed    0.01 sec
    Start 3: my-static-name-boost-test
3/4 Test #3: my-static-name-boost-test ........   Passed    0.01 sec
    Start 4: my-dynamic-boost-test
4/4 Test #4: my-dynamic-boost-test ............   Passed    0.09 sec

100% tests passed, 0 tests failed out of 4

Total Test time (real) =   0.13 sec

As mentioned, that output does not correspond to the current output of "make test". With Dexy you replace that hard-coded example by the following Dexy construct:

{{ d['make-test.sh|bash']|indent(2) }}

When you run Dexy, it creates a copy of running-tests.rst where the above construct is replaced with output of the shell script make-test.sh [1], which it indents by 2 columns. In other words, it replaces the construct by:

Running tests...
Test project /home/pieter/bitbucket.org/cmake-boost-test/build/beck
    Start 1: my-boost-test
1/5 Test #1: my-boost-test .......................   Passed    0.12 sec
    Start 2: my-static-boost-test
2/5 Test #2: my-static-boost-test ................   Passed    0.11 sec
    Start 3: my-static-name-boost-test
3/5 Test #3: my-static-name-boost-test ...........   Passed    0.15 sec
    Start 4: my-static-find-package-boost-test
4/5 Test #4: my-static-find-package-boost-test ...   Passed    0.04 sec
    Start 5: my-dynamic-boost-test
5/5 Test #5: my-dynamic-boost-test ...............   Passed    0.07 sec

100% tests passed, 0 tests failed out of 5

Total Test time (real) =   0.53 sec

Dexy uses a config file that describes what it has to do. For this example the config file, named .dexy, could look like this:

{
  "running-tests.rst|jinja" {
    inputs: ["make-test.sh|bash"]
  },
}

This config gives an indication of how Dexy works. It passes the file running-tests.rst through a so-called filter with the name "jinja". This filter treats the file mentioned before it as a Jinja template and evaluates that template [2]. To be able to do so, Dexy first passes make-test.sh through the filter "bash", which executes the shell script and captures its output. The end result is a copy of running-tests.rst that contains the output of a new invocation of "make test".

The above barely scratches the surface of what Dexy can do and you should visit the Dexy website for some impressive examples. In the "Garlicsim" example Dexy runs a simulation in Python, analyzes the results in R and packages it in a single document that describes simulation, code and outcome.

[1] This simple shell script executes "make test" in the CMake build directory.
[2] Jinja is a well-known Python templating engine.

Documentation on cmake-boost-test

I have made two major changes to the documentation of my code samples in repo cmake-boost-test at Bitbucket. First, I use the Python tool "Sphinx" to author the documentation and second, I use Bitbucket to publish the documentation.

Initially I used a single README located in the root of the repo to contain the documentation. Such a README often suffices to contain the first version of any documentation. Another advantage is that Bitbucket automatically shows you the README of a repo when you visit the repo at bitbucket.org. This makes for a very nice welcome for visitors.

However, as I added new code and documentation, the single README started to become a bit unwieldy. So I decided to use Sphinx, a Python tool developed to write all kinds of documentation. From the Sphinx website

It was originally created for the new Python documentation, and it has excellent facilities for the documentation of Python projects, but C/C++ is already supported as well.

Sphinx uses reStructuredText as its markup language and allows multiple inputs, multiple output formats, extensive cross-referencing, code highlighting and much more. I had already used Sphinx to write user documentation and to document Python and Django apps so I new my way around.

Sphinx works by processing a set or reStructuredText documents that contain the information and create the documentation in one or more of its output formats. This brings me to the second major change, you can find the HTML-formatted documentation that Sphinx generates of cmake-boost-test at http://swinkels.bitbucket.org/cmake-boost-test To do so I make use of the functionality to publish a static website of Bitbucket.[1]_

There are several things I could / should do next. For example, I have not changed the README so as it stands it is more or less a duplicate of the documentation written using Sphinx. Furthermore, that documentation is not ready yet. The contents of the CMake file list would benefit from a better description, as would the current unit tests, etc. Also the update of the documentation at Bitbucket is a manual affair which could be automated. But for now I am quite content with the current setup.

[1] See https://confluence.atlassian.com/display/BITBUCKET/Publishing+a+Website+on+bitbucket

Python dictionary keys

  • updated 2012/07/18 to improve the text: the initial version was clearly a work-in-progress

This is an old blog post which I wrote in November of 2011 but which I never published, until now that is.

At work I stumbled onto a subtle bug when I reimplemented a class whose objects where used as a key in a dictionary. Look at the following situation, where I create two dictionaries with the same key:

>>> class B(object):
...   def __init__(self, name):
...     self.name = name
...
>>> pieter = B("Pieter")
>>> name2birthday = { pieter: "September 24th" }
>>> name2nationality = { pieter: "Dutch" }
>>> print name2birthday.items()
[(<__main__.B object at 0x80ab26c>, 'September 24th')]
>>> print name2nationality.items()
[(<__main__.B object at 0x80ab26c>, 'Dutch')]

Because the two dictionaries use the same key, I can iterate over the keys of the first dictionary to iterate over the keys of the second dictionary:

>>> for key, value in name2birthday.items():
...   print name2birthday[key]
...   print name2nationality[key]
...
September 24th
Dutch
>>>

But then I pickle and unpickle the two dictionaries and try to repeat the same trick:

>>> import pickle
>>> pickled_name2birthday = pickle.dumps(name2birthday)
>>> pickled_name2nationality = pickle.dumps(name2nationality)
>>> name2birthday = pickle.loads(pickled_name2birthday)
>>> name2nationality = pickle.loads(pickled_name2nationality)
>>> for key, value in name2birthday.items():
...   print name2birthday[key]
...   print name2nationality[key]
...
September 24th
Traceback (most recent call last):
  File "<stdin>", line 3, in <module>
KeyError: <__main__.B object at 0x80ad1ec>
>>>

Huh, the original situation was not as clear to debug as the example above, but it turns out that pickling and unpickling the dictionaries creates not one new key object but two distinct key objects, one for name2birthday and one for name2nationality.

As soon as I suspected this, I knew I had to read up a little on the way Python implements dictionaries. The following article was extremely helpful: http://wiki.python.org/moin/DictionaryKeys

Python dictionaries use a hash function to find the bucket that stores the object in a O(1) time:

all user defined types are usable as dictionary keys with hash(object) defaulting to id(object), and cmp(object1, object2) defaulting to cmp(id(object1), id(object2))

The id function returns the address of the object and directly after creation, there was one pieter object that was used as the key. However after unpickling, there were two pieter objects. This meant I could not use the default hash function.

Furthermore the aforementioned Python Wiki page states the following:

To be used as a dictionary key, an object must support the hash function (e.g. through __hash__), equality comparison (e.g. through __eq__ or __cmp__), and must satisfy the correctness condition above.

The equality comparison is used to find the right key object in case the hash function results in the same bucket for two different objects. The correctness condition mentioned states that if two key objects have the same hash value, they are equivalent. sSo I extended class B with its own __hash__ and __eq__ functions:

>>> class B(object):
...   def __init__(self, name):
...     self.name = name
...   def __hash__(self):
...     return hash(self.name)
...   def __eq__(self, other):
...     return self.name == other.name
...
>>> pieter = B("Pieter")
>>> name2birthday = { pieter: "September 24th" }
>>> name2nationality = { pieter: "Dutch" }
>>> pickled_name2birthday = pickle.dumps(name2birthday)
>>> pickled_name2nationality = pickle.dumps(name2nationality)
>>> name2birthday = pickle.loads(pickled_name2birthday)
>>> name2nationality = pickle.loads(pickled_name2nationality)
>>> for key, value in name2birthday.items():
...   print name2birthday[key]
...   print name2nationality[key]
...
September 24th
Dutch
>>>

Voilà!

CTest to run executables

In my previous blog post I mentioned some sample code I wrote to show how to use the Boost Unit Test Framework. This sample code, which I published at Bitbucket in repo cmake-boost-test, also serves another purpose, namely to show how to use CMake to build the code.

Since writing that post I have updated the CMake build description - called the filelist - to generate a Makefile target that runs the test executables. Before these changes, I had to run the executables explicitly, for example:

$> make
[ 14%] Built target my-boost-test
[ 42%] Built target my-dynamic-boost-test
[ 71%] Built target my-static-boost-test
[100%] Built target my-static-name-boost-test
$> ./my-boost-test
Running 2 test cases...
/home/pieter/bitbucket.org/cmake-boost-test/tests.h(10): error in "TestThatFails": check false failed

*** No errors detected

With the updated filelist, I can execute all tests with a single command:

Running tests...
Test project /home/pieter/bitbucket.org/cmake-boost-test/build/beck
    Start 1: my-boost-test
1/4 Test #1: my-boost-test ....................   Passed    0.01 sec
    Start 2: my-static-boost-test
2/4 Test #2: my-static-boost-test .............   Passed    0.23 sec
    Start 3: my-static-name-boost-test
3/4 Test #3: my-static-name-boost-test ........   Passed    0.07 sec
    Start 4: my-dynamic-boost-test
4/4 Test #4: my-dynamic-boost-test ............   Passed    0.23 sec

100% tests passed, 0 tests failed out of 4

Total Test time (real) =   0.57 sec

This is made possible by CTest, which is distributed as a part of CMake. CTest can do a lot more than what I use it for at the moment, "automate updating, configuring, building, testing, performing memory checking, performing coverage"[1]. The remainder of this post describes how I use CTest. You can find this description also in the README of the aforementioned repo.

To generate the Makefile target test, I added the following lines to the CMake listfile:

enable_testing()

# The first parameter specifies the name of the test. The second parameter the
# path to the executable to execute.
add_test(my-boost-test ${CMAKE_CURRENT_BINARY_DIR}/my-boost-test)
# When the second parameter specifies an executable target, you can omit the
# path as is done in the following examples
add_test(my-static-boost-test my-static-boost-test)
add_test(my-static-name-boost-test my-static-name-boost-test)
add_test(my-dynamic-boost-test my-dynamic-boost-test)

The command make test runs ctest. If you use ctest directly, you can specify which tests to run. For example,:

$> ctest -R my-boost-test

only executes my-boost-test and gives me the following output:

Test project /home/pieter/bitbucket.org/cmake-boost-test/build/beck
    Start 1: my-boost-test
1/1 Test #1: my-boost-test ....................   Passed    0.01 sec

100% tests passed, 0 tests failed out of 1

Total Test time (real) =   0.03 sec

The option -R tells ctest to only run the tests whose name are matched by the regular expression that follows the option. So in the previous example, the command ctest -R my-boost would have executed the same test.

The above is not even the tip of the iceberg of functionality that CTest provides. To get a brief description of all the CTest options, execute:

$> ctest --help

For a more elaborate description in HTML, execute:

$> ctest --help-html
[1] This quote can be found at http://vtk.org/Wiki/CMake/Testing_With_CTest

Boost Unit Test Framework

In my new job I am back to using C++ again. One of the first things that drew my attention was the C++ unit test framework that "we" use. In my opinion that framework has some drawbacks - non-disclosure here :( - and I decided to look for an alternative. Some Googling taught me that the Boost Unit Test Framework (UTF) is a well-regarded one so I decided to look into that, also as the Boost framework is already used here.

My initial impressions of the UTF are positive. Tests are really easy to write as they require next to no boilerplate code. As always with Boost, the library itself is well-maintained and well-documented. And in case the docs do not provide you with an answer, that answer is only a search query away.

Although the UTF has some extensive documentation, it still took me some time to get my sample code running. It turned out to be really easy in the end and I have published my code samples at Bitbucket in repo cmake-boost-test. The remainder of this post contains a slightly modified version of the README of that repo, at least as it was at the moment of writing this post.

Usage variants

As described in the UTF documentation in the section on Usage variants, there are several ways you can use the UTF in your code: by including a single header, by linking against a static library or by linking against a dynamic library. This repo contains examples of these variants of using the UTF. They are built and tested using Boost 1.49.0, CMake 2.8.7, and Ubuntu 12.04.

Code

Header file tests.h contains two tests:

BOOST_AUTO_TEST_CASE(TestThatSucceeds)
{
  BOOST_CHECK(true);
}

BOOST_AUTO_TEST_CASE(TestThatFails)
{
  BOOST_CHECK(false);
}

Usually I would not implement tests in a header file but in this way I can demonstrate the different variants without having to duplicate the test code.

Binary my-boost-test is built from main.cpp, which includes the single header variant of unit_test.hpp:

#define BOOST_TEST_MAIN

#include <boost/test/included/unit_test.hpp>

#include "tests.h"

When you compile this into an executable, a main function is automatically created . This function collects all the tests in a test suite called "Master Test Suite", executes them and writes the results to stdout. That is all there is to it.

When you define BOOST_TEST_MODULE instead of BOOST_TEST_MAIN, the main test suite is named after your define of BOOST_TEST_MODULE. For example,

#define BOOST_TEST_MODULE  "This is my test suite."

will create a main test suite that is called "This is my test suite". This also holds for the other variants.

There is a limitation with the single header variant: all the tests have to be implemented in a single file. As the example shows you can work around this if you implement the tests in header files but that is not the way header files should be used. If you want to implement the tests in separate files, you have to link against the static or dynamic Boost unit test library.

Binary my-static-boost-test is linked against the static Boost unit test library. It is built from main-static.cpp:

#define BOOST_TEST_MAIN

#include <boost/test/unit_test.hpp>

and from tests.cpp:

#include <boost/test/unit_test.hpp>

#include "tests.h"

This variant differs in two other ways from the single header variant:

  1. the header file to include is different;
  2. the executable has to be linked against libboost_unit_test_framework.a.

Note that you have to define BOOST_TEST_MAIN once before the inclusion of unit_test.hpp. If you do not do this, the test suite initialization function, which is required, is not automatically created. If you do this more than once, the initialization function will be defined multiple times, which will break the build.

Binary my-dynamic-boost-test links against the dynamic Boost unit test library and is built from main-dynamic.cpp:

#define BOOST_TEST_DYN_LINK
#define BOOST_TEST_MAIN

#include <boost/test/unit_test.hpp>

and the aforementioned tests.cpp. This variant differs in two ways from the static library variant:

  1. BOOST_TEST_DYN_LINK needs to be defined before the inclusion of the header file;
  2. the executable has to be linked against libboost_unit_test_framework.so.

Final notes

When you use the dynamic variant, if you do not define BOOST_TEST_MAIN or BOOST_TEST_MODULE, you can (and have to) define your own test runner. This variant is called the external test runner variant. I have not looked into this (yet).

Finally, the CMake listfile specifies the build of two binaries with the word static in them: my-static-boost-test and my-static-name-boost-test. These binaries differ in the way the listfile specifies where the Boost unit test library is located:

  • for my-static-boost-test, it specifies the full path to the library;
  • for my-static-name-boost-test, it specifies the name of the library.

This is a side effect of the fact that I used this code to familiarize myself with CMake.

False positives

The last few months I have been working on a Django app that computes (among others) the set of water flows that go into or come out of a water body, also called the water balance. A few weeks ago, one of our customers indicated that the computation contained a bug. After some investigation on my side, it turned out that the computation was correct and that the bug report was a "false positive". Read on for what happened and what I learned from that.

The fraction distribution is a subset of the computed time series that specifies which fraction of the water of the water body comes from which incoming water flow. The picture below, from one of our older websites, depicts such a distribution:

/images/fraction-distribution.png

At the start of the first day, we assign the label "initial" to all the water of the water body, so 100% of the water "was initially there". During the day new water comes in, for example due to precipitation and seepage, and already present water goes out, for example due to evaporation. At the end of the day, we might calculate that 80% of the water still present was initially there, that 10% came in due to precipitation and another 10% due to seepage. At each day the percentages should add up to 100. However, our customer reported that the total percentage started at 100% but declined as the days went on.

I knew the code to compute the fractions had worked in the past but I had refactored and changed other parts of the computation engine. And although the refactorings were supported by a big acceptance test, this test probably did not cover every possible input. As the implementation of the "fraction computer" was not supported by unit tests (that is a long story by itself), I decided to look into the implementation first.

A review of the code did not bring any issues to light. I added some debugging statements and ran the code on another test case. That output of intermediate results indicated that the fraction distribution was computed correctly. Maybe the problem was with the export of the time series? So I manually checked whether the totals of the 16 different time series added up to 100% for a specific day and they did.

By now I had the feeling the problem might be at the customers code. We decided to meet and it quickly turned out that he did only not use all the time series that specify the fraction distribution. To be honest, I was glad the problem was not in my code, but the fact remains that a problem in his code cost him and me valuable time.

These kind of false-positive issues will always crop up. This issue I could have resolved more quickly if I would have worked the other way around: from the way the customer used the time series, to the time series, to the code. As mentioned I was not entirely sure about the code and I started from there. Why was I not sure about the code? Did I doubt my own work? Apparently I did, even though I had several automated tests that verified the results. So I decided to develop a script that could check the totals of the fraction distribution. You can find the results of that work on the lizard-waterbalance repo on GitHub in module lizard_wbcomputation/check_fractions.py.

This script paid for its development time within a day. Since I had received the initial bug report I had made some changes to the code: fractions were not reported as percentages anymore but as real values in the range [0,1]. The script showed that my modifications were incomplete as the fractions would start in the 100.0 range... Glad I caught that.

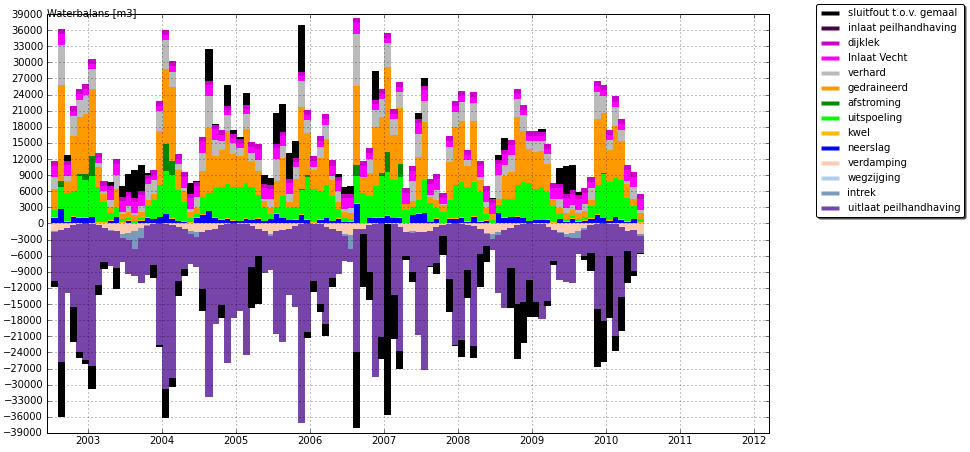
This check would spin off another check. For a water balance the sum of incoming water on a day should equal the sum of outgoing water and a delta of the water storage. The following picture depicts a water balance and its the symmetry:

/images/waterbalance.png

Up till then the only way to check this was to inspect the water balance graph to see whether the bars above the horizontal axes would mirror the ones below it. check_fractions provided me with the infrastructure to quickly implement the symmetry check and so check_symmetry was born, see the same GitHub repo in module lizard_wbcomputation/check_symmetry.py. Again the check paid for itself almost immediately. It turned out that some input time series were always positive were I expected them to be negative.

What did I learn from this? Well, when you want to make sure an algorithm and/or its implementation is correct, you can verify that all the steps towards that outcome are correct. You can also maintain multiple test cases to guard against regressions. But never underestimate the power of automated checks of the output. It was a good lesson to be learned (and to be honest, to be learned again :)

Emacs and Subversion merge conflicts

Emacs has support for multiple version control systems and as such, for many version control operations. But there are operations I prefer to execute from the shell and one of those operations is branch merging. To be honest, I do not know whether that can be done from Emacs and for Subversion, which is still the main version control system at my workplace.

However, Emacs can support you when you have to resolve merge conflicts, thanks to the Smerge minor mode and Ediff. In this blog post I explain how that works. Before I do so, I start with some background information about Subversion merge conflicts.

Assume you execute the SVN command as follows:

svn merge -r <initial>:<final> <source URL> <working directory>

This command tries to automatically merge the changes from changeset revision "initial" up to and including those from changeset "final" of the repository at <source URL> to the code at the specified <working directory>.

When a merge leads to a conflict and you decide to postpone the conflict resolution, SVN creates three files for the file that has the conflict. For example when the conflict occurs in file setup.py, Subversion creates the following three files:

  • setup.py.merge-left.r<initial>
  • setup.py.merge-right.r<final>
  • setup.py.working

The merge-left file contains the first revision that has to be merged from the source URL and the merge-right file contains the last revision. The working file contains the current version of the file to which the changes in the source URL have to be applied.

Subversion also modifies setup.py as well as it can. In our case, not every change to setup.py could be automatically applied and the new setup.py contains an unresolved conflict like this:

<<<<<<< .working
version = '2.3dev'
=======
version = '1.79.1.3dev'
>>>>>>> .merge-right.r23929

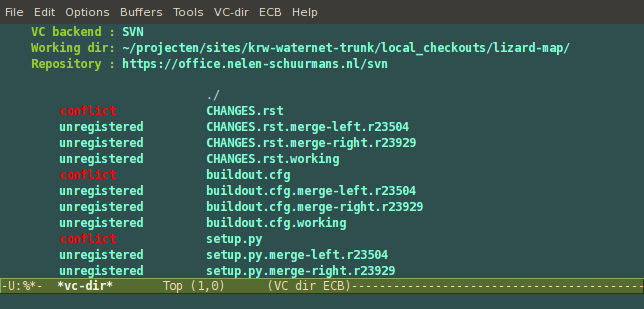
As mentioned, Emacs can help you resolve each conflict in several ways. One way is through the vc-dir command, which gives me the version control state of all the files in a directory tree. In Emacs, this looks like this:

/images/vc-dir.png

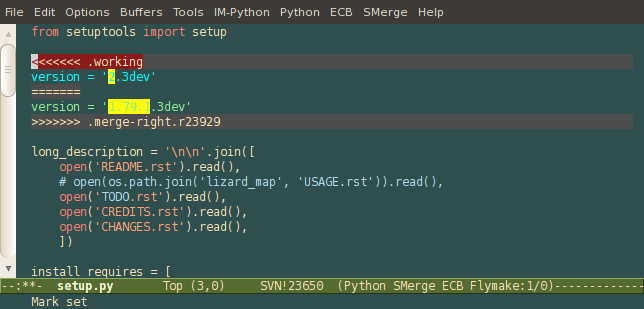
Let us resolve the issue in the setup.py, When I open setup.py, Emacs automatically opens it in Smerge mode. This mode highlights conflicts, allows me to jump to the next (or previous) conflict etc.

/images/smerge-mode.png

For me, Smerge is not the ideal tool for conflict resolution. It provides me with a single pane view of the conflicts where I prefer a two-pane view such as the one Ediff provides. Furthermore, I cannot seem to memorize its key-bindings, which always make me grab the mouse.

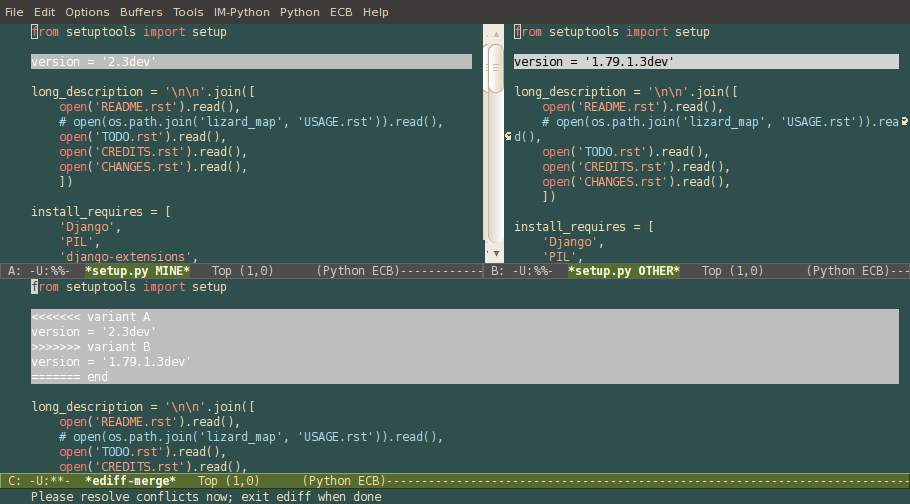
Fortunately, Smerge can call Ediff to handle the conflict resolution. Press C-c ^ E and an Ediff session opens which allows me to perform the necessary actions in a two-pane view:

/images/ediff-merge.png

The top-left pane contains the setup.py in my working directory as it was before the merge, the top-right pane contains the final revision of setup.py at the source URL and the bottom pane contains the merged version.

The really nice thing is that as soon as I end the Ediff session, Emacs goes back to the conflicted file with all the changes done in the Ediff session applied. So if you have resolved all conflicts, the file is not in Smerge mode anymore. The only thing left to do is to save the file. After that, the state of the file as displayed in the vc-dir buffer changes from conflicted to edited.

A revamped blog

Time for a revamped blog! Two years ago I started my blog "The journey that counts" at blogger.com. The total amount of posts since then? 4. That is what you get with a mild affliction of perfectionism and too little time. Together they form a fertile ground for some serious procrastination.

But there were other, more technical, reasons for not blogging (although some of them may have become invalid since my initial posting in 2009). For example, blogger.com requires you to use HTML to write the posts or the built-in WYSIWYG editor. I do not like either of these options: HTML requires me to focus too much on its syntax and the WYSIWYG editor appeared to be too much of a black box. It was also difficult to include pretty-printed source code, which is a big drawback for a programming related blog. But to be honest, none of the technical reasons were real showstoppers.

Last September I started a new job in web development and it has been an exciting time. So many new experiences (and knowledge) to write about. The perfectionism is still there as is the lack of time - being a proud father and having a 3 hours daily commute does not help. But the urge to write about my life and work as a software developer is also still there. Therefore I decided to create my own blog site using (some of) my newly developed skills. You are looking at the results.

I did not want to create a personal blog website from scratch. There are several frameworks and libraries for that. The framework should be easy to use, extendible and preferably written in Python. I am a Django developer but Django seemed like overkill for the simple static website I had in mind. After a short internet search, I decided to use blogofile.

For the look and feel I wanted to create my own CSS but I am software developer primarily and not an artist. After a short internet search, again, for a free CSS theme, I settled for the Emplode theme. I had to make some modifications to get it to work with blogofile but everything was doable.

The next step was to find a server to host my blog. I did not want to host it from home for the simple reason that I do not want to have a computer running day-in day-out. There are lots of providers with seemingly suitable offerings and the German proverb "Die Qual der Wahl" (in English, "The torment of the choice") appeared to be really appropriate. In the end I settled for an VPS running Ubuntu 10.04.

I also considered the use of just a webhost but a VPS offers so much more. One of its advantages is the availability of version control, which makes it so easy to update my website. Of course, a VPS is more work to maintain and I had to read op on SSH, public and private keys, Apache2 etc. But that is knowledge that always comes in handy.

The final step was to select a domain name. Easy, right? In the end I went through several names (and domain registrations :) before I settled for journeythatcounts.nl. The blog can be found at blog.journeythatcounts.nl.

The weblog is not yet finished. I still have to transfer the posts on my previous blog, fix the highlighting of the current tabs at the top of the page, integrate Disqus for comments etc. But I thought it is better to have a functional website out than to have to perfect one out (which will probably never happen). The most important thing is that I have setup my own blog on my own website and I learned a lot from that.